Synthesis Tutorial
Classiq's synthesis engine takes a high-level model written in the Qmod language, and compiles it into an executable gate-level circuit.
When mapping high-level functionality to concrete circuits, there may be many different but equivalent possible implementations that reflect tradeoffs in the overall depth, width, gate counts, etc. For example, implementing a multi-controlled-not operation can be shallower in gates given more auxiliary qubits. Choosing the best implementation for a specific operation instance depends on the overall constraints and objectives, as well as the specific structure of the quantum program.
Let's look at a simple model, and use Classiq's synthesis engine to compile it given different optimization objectives.
from classiq import *


@qfunc
def main(x: Output[QNum[3]], y: Output[QNum]) -> None:
    allocate(x)
    hadamard_transform(x)
    y |= x**2 + 1
First, let's synthesize to optimize on circuit depth, i.e. to minimize the longest path formed by gates in the circuit (and hence affects the required coherence time).
qprog_opt_depth = synthesize(
    model=main,
    constraints=Constraints(optimization_parameter=OptimizationParameter.DEPTH),
)
We can inspect the resulting circuit using Classiq's web visualization:
show(qprog_opt_depth)
Quantum program link: https://platform.classiq.io/circuit/319KlN64C4oX3KLiMFXcQrhtRwr
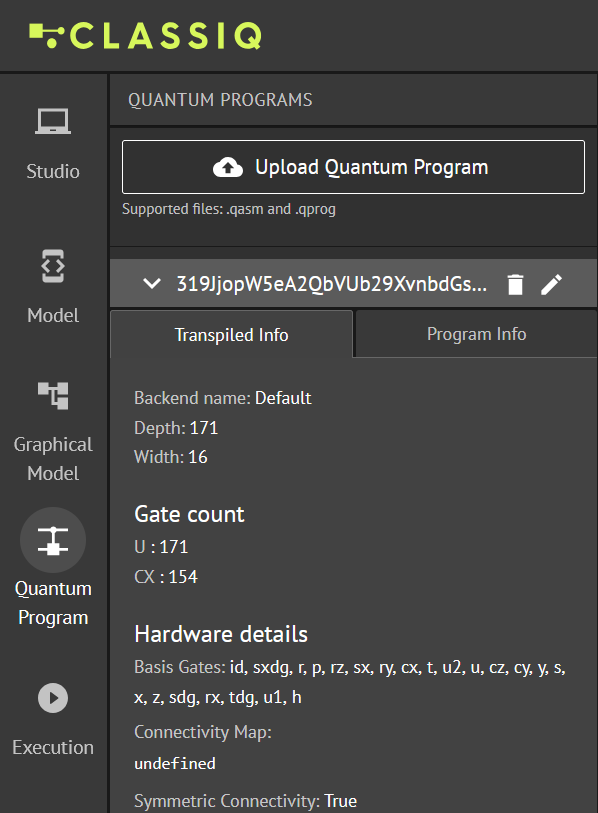
On the left side menu, under 'Transpiled info', you should see the resulting depth, width and gate-count:

The resulting depth and width are 171 and 16, respectively. This information can also be obtained using data.width and transpiled_circuit.depth:
depth = qprog_opt_depth.transpiled_circuit.depth
width = qprog_opt_depth.data.width
print("Depth: ", depth, ". Width: ", width)
Depth: 171 . Width: 16
Now, let's synthesize to optimize width, i.e to minimize the number of qubits used.
qprog_opt_width = synthesize(
    model=main,
    constraints=Constraints(optimization_parameter=OptimizationParameter.WIDTH),
)
Inspect the resulting circuit:
show(qprog_opt_width)
Quantum program link: https://platform.classiq.io/circuit/319Km1ZWgqCcVR903Cn4Cd05egy
print(
    "Width =",
    qprog_opt_width.data.width,
    ", Depth =",
    qprog_opt_width.transpiled_circuit.depth,
)
Width = 9 , Depth = 199
The new depth and width are 199 and 9, respectively. As expected, we "pay" with extra depth for an implementation that uses less qubits.
Visualization
When opening a quantum program using the show command, the visualization provides details regarding the quantum circuit's structure. Key characteristics, such as gate count, qubit usage, and circuit depth, are displayed.
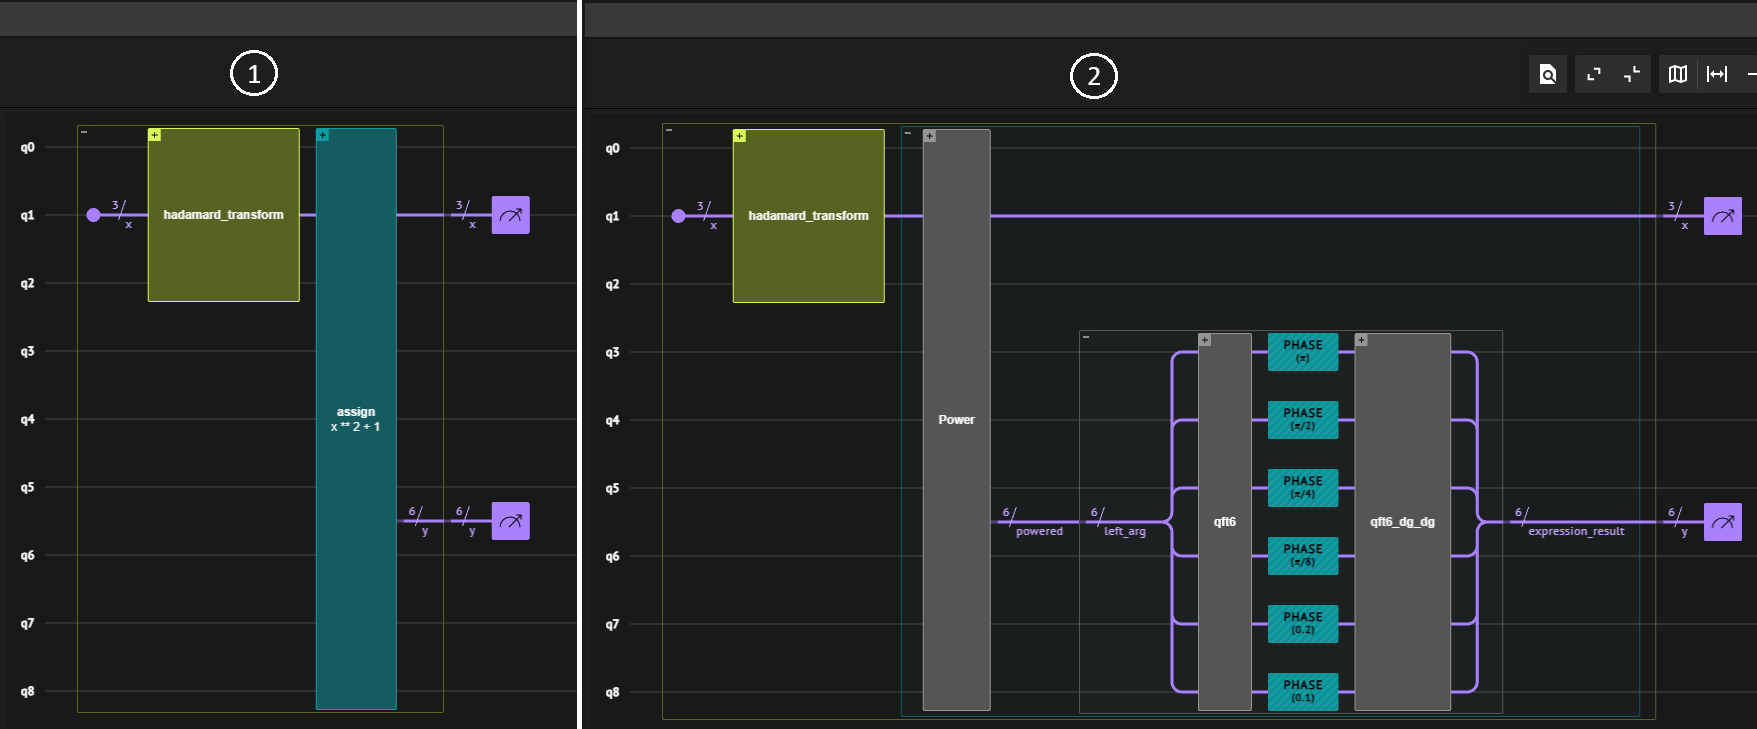
The visualization is organized according to the building blocks used during the quantum program construction. These blocks represent modular components or routines in your quantum algorithm. By clicking on the "+" sign on a block, you can expand it to reveal the underlying quantum gates, making it easier to inspect, debug, or understand the algorithm's logic at both high and low levels.
This can be seen in the following figure: the left panel represents a high-level view showing the quantum blocks used in the algorithm—such as hadamard_transform and assign x**2 + 1—while the right panel shows an expanded view of the assign block, revealing the underlying quantum gate sequence. Gates include multiple PHASE operations and a quantum Fourier transform block (qft6), offering insight into the inner workings of this computation.

Exporting and Sharing
In addition to visualizing a quantum program, the tool provides convenient options to export the quantum circuit in multiple formats, enabling integration with other tools and workflows. Some of them are:
-
QASM: Allows interoperability with quantum simulators and hardware platforms.
-
LaTeX: Produces a high-quality, pictorial representation of the circuit, ready for inclusion in LaTeX files.
-
JPEG: Generates a graphical image of the circuit.
To facilitate collaboration, there is a Share button that generates a unique link that you can send to anyone who wants to view your circuit directly in their browser — no login required.
Exercise
Create your own main function and synthesize it with different constraints.
Note that OptimizationParameter is only one kind of configuration possible. Classiq synthesis engine also supports rigid constraints of max_width, max_depth and max_gate_count.