This is an enterprise-grade feature available exclusively to Classiq’s enterprise customers.
The Quantum Engineer plugin brings Classiq expertise directly into your agentic coding platform. It teaches coding agents like Claude Code, Cursor, Codex, and Copilot how to model, synthesize, execute, analyze, and post-process quantum programs with Classiq.Build, run, and analyze quantum programs in natural language: describe what you want and the agent handles every step, from writing the model to reading back results.Programs are expressed in Qmod, and draw on the open library of reusable quantum functions. Synthesis delegates to Classiq’s backend engine, which compiles high-level models into hardware-optimized circuits automatically.The plugin includes skills for each phase of quantum development:
Modeling: write quantum algorithms in Python using Classiq.
Synthesis: compile a model into a quantum program with synthesize(), constraints, and hardware targets.
Execution: run circuits with sample, observe, calculate_state_vector, and variational loops.
Post-processing: interpret results such as histograms, energy curves, and most-probable states.
Analyzer: inspect synthesized programs for gate counts, depth, and hardware fit.
Qiskit migration: translate existing Qiskit code into Classiq models.
A built-in reference layer keeps the agent’s knowledge current as it works.
First, download the plugin zip from the Classiq platform. The zip includes all skills discussed above and the MCP server configuration.
Classiq Platform
Quantum Engineering Interface
Open the Downloads menu in the top bar on the right, then click AI Plugin. The top bar is available from any page in the Classiq platform.
Open the Quantum Engineering interface from the banner at the top of the Classiq platform’s main page. Then, in the left sidebar, under More from Classiq, click AI Plugin.
After downloading and extracting the zip file, follow the steps below to install the plugin on your agentic coding platform of choice.
Claude Code
Cursor
Codex
Copilot
The Quantum Engineer plugin is supported in the Claude Code CLI and in its VS Code and JetBrains IDE integrations. The desktop and web applications do not support loading local plugins.
For a persistent install, copy the extracted plugin directory into your Claude Code skills folder:
Any folder there with a .claude-plugin/plugin.json manifest loads automatically every session, with no flag or marketplace needed. The skills appear namespaced under the plugin, for example classiq-quantum-engineer:classiq-modeling.Alternatively, for a one-off session, point Claude Code at the extracted directory using the --plugin-dir flag (this loads the plugin for that session only, so you must pass it each launch):
claude --plugin-dir /path/to/classiq-quantum-engineer
On first use you will be prompted to approve the classiq-mcp server. After approving, the plugin’s skills and MCP configuration are active.To verify the installation, run /skills and confirm the Classiq skills are listed, then run /mcp and confirm the classiq-mcp server is connected. As a quick smoke test, you can also ask the agent to look up the Classiq docs for synthesize and watch that it calls the classiq-mcp server.To pick up a newer version of the plugin, download the latest zip from the platform, replace the directory (under ~/.claude/skills/ or wherever you loaded it from), and run /reload-plugins, or start a new session.
The Quantum Engineer plugin is supported on the Cursor desktop application and CLI.
First, create the local plugins folder if it doesn’t already exist, and copy the extracted plugin directory into it:
To load the plugin in the Cursor desktop application, reload Cursor by opening the Command Palette (Cmd+Shift+P) and running Developer: Reload Window, or simply restart the application. After the plugin is loaded, open Customize and confirm the plugin, its skills, and the classiq-mcp server all appear.If you’re using the Cursor CLI, point enabled_plugins in ~/.cursor/settings.json at the local plugin folder so it loads persistently in every session.Alternatively, for a one-off session, pass the --plugin-dir flag:
Finally, run /mcp (or agent mcp list) to confirm the classiq-mcp server is connected, and type / to check the plugin’s skills appear in the menu. As a quick smoke test, you can also ask the agent to look up the Classiq docs for synthesize and watch that it calls the classiq-mcp server.To pick up a newer version of the plugin, download the latest zip from the platform, replace the extracted directory, and reload (desktop) or restart the CLI session.
The Quantum Engineer plugin is supported in local Codex environments, including the Codex CLI, desktop application, and IDE extensions. The web application does not support local plugins at the moment.
Installing the plugin on Codex requires creating a personal marketplace (if you don’t already have one) and registering the plugin within it.First, place the extracted Quantum Engineer plugin directory under ~/plugins/:
Start a new Codex task or session so the skills and MCP configuration are loaded successfully, as already-running sessions will not pick up newly installed plugins.To verify the installation, run /skills and confirm the Classiq skills are listed, then run /mcp and confirm the classiq-mcp server is connected. As a quick smoke test, you can also ask the agent to look up the Classiq docs for synthesize and watch that it calls the classiq-mcp server.To update to a newer version, download the latest zip from the platform, replace the directory under ~/plugins/, and re-run codex plugin add classiq-quantum-engineer@personal. Then start a new session. If the plugin version in .codex-plugin/plugin.json has changed between releases, Codex installs the updated package instead of reusing a cached copy.
The Quantum Engineer plugin is supported on GitHub Copilot in VS Code. The desktop application does not support local plugins.
In VS Code, open the Copilot agent window. In the left sidebar, under Customizations at the bottom, click Plugins. Then, to the right of the Available section, you will find the Install from Source button. Click it and provide the path to the extracted plugin directory.The plugin then appears under Installed as classiq-quantum-engineer with a Local badge, listing the skills and MCP server it provides. Use the toggle beside it to enable or disable the plugin.To verify the installation, head to Skills and MCP Servers under Customizations, and confirm the Classiq skills and the classiq-mcp server are listed.To pick up a newer version of the plugin, download the latest zip from the platform, replace the extracted directory, and install it from source again.
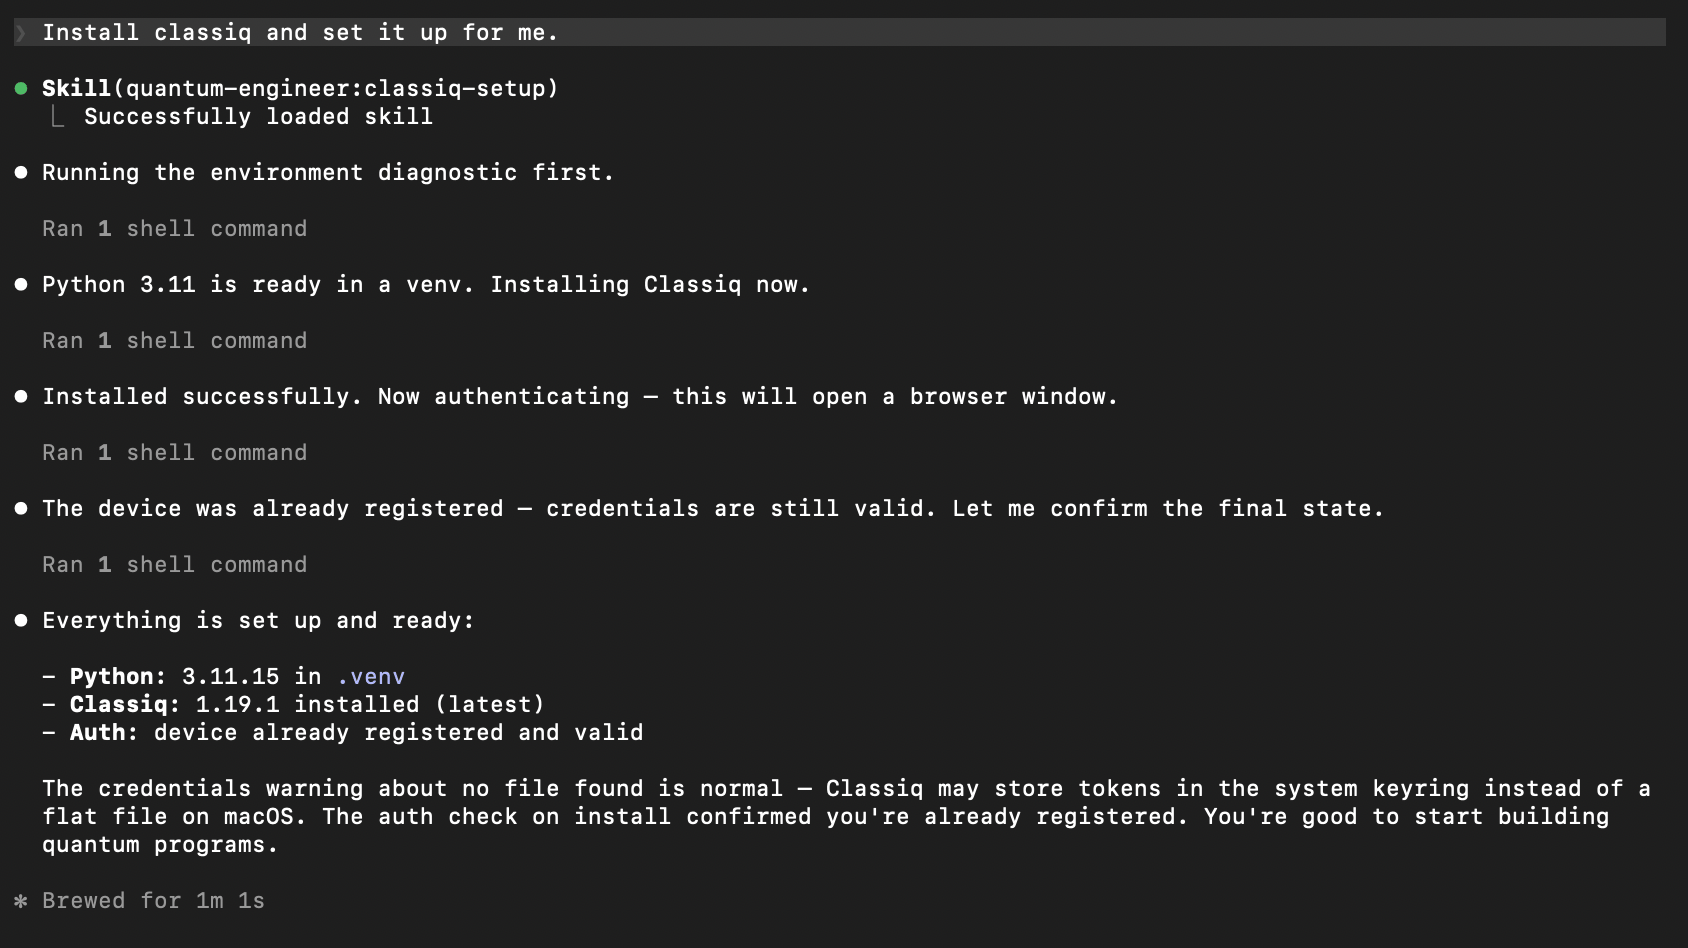
The plugin requires the classiq Python package. If you don’t have it yet, ask the agent to install it and the bundled classiq-setup skill will handle installation and authentication. See the Install Classiq example in Examples.
Each platform supports a project-level file that the agent reads at the start of every conversation. Use it to record your Python environment and any project-specific conventions, so the agent never has to ask and never guesses wrong.
Claude Code
Cursor
Codex
Copilot
Create CLAUDE.md at the root of your project and fill in the bracketed fields:
# [Project Name]## Environment- Python: [path/to/venv/bin/python] <!-- or just `python3` if using the system default -->- Classiq SDK: installed in the environment above## BackendDefault: Classiq cloud simulator.[Optional: list hardware targets or execution preferences for this project.]## Project overview[One or two sentences describing the quantum algorithms or application this project implements.]## Conventions[Any project-specific patterns: naming, file layout, preferred synthesis constraints, etc.]
Claude Code picks up CLAUDE.md automatically, no additional configuration required.
Create .cursor/rules/classiq.mdc at the root of your project. This file gives Cursor persistent Classiq-specific context for the project.
---description: Classiq project contextalwaysApply: true---# [Project Name]## Environment- Python: [path/to/venv/bin/python] <!-- or just `python3` if using the system default -->- Classiq SDK: installed in the environment above## BackendDefault: Classiq cloud simulator.[Optional: list hardware targets or execution preferences for this project.]## Project overview[One or two sentences describing the quantum algorithms or application this project implements.]## Conventions[Any project-specific patterns: naming, file layout, preferred synthesis constraints, etc.]
The alwaysApply: true frontmatter tells Cursor to load this rule for every conversation in the project.To verify the rule is active, open Settings → Rules and confirm the project rule appears. You can also ask the agent: “What Classiq project context do you see?” The response should reflect the environment and conventions from .cursor/rules/classiq.mdc.
Create AGENTS.md at the root of your project and fill in the bracketed fields:
# [Project Name]## Environment- Python: [path/to/venv/bin/python]- Classiq SDK: installed in the environment above## BackendDefault: Classiq cloud simulator.[Optional: list hardware targets or execution preferences for this project.]## Project overview[One or two sentences describing the quantum algorithms or application this project implements.]## Conventions[Any project-specific patterns: naming, file layout, preferred synthesis constraints, etc.]
Codex reads applicable AGENTS.md files when working in the project. In the Codex CLI and desktop application, you can also run /init to generate a starter AGENTS.md.
Copilot reads AGENTS.md and CLAUDE.md from your project root, so if you already created one of those for Codex or Claude Code, Copilot picks it up as is with no extra file.To use a Copilot-specific file instead, create .github/copilot-instructions.md with the same content:
# [Project Name]## Environment- Python: [path/to/venv/bin/python]- Classiq SDK: installed in the environment above## BackendDefault: Classiq cloud simulator.[Optional: list hardware targets or execution preferences for this project.]## Project overview[One or two sentences describing the quantum algorithms or application this project implements.]## Conventions[Any project-specific patterns: naming, file layout, preferred synthesis constraints, etc.]
Once the plugin is installed, just describe what you want in natural language, no special syntax required. The agent picks the right skill for each phase of the work:
You ask for
Skill that responds
Writing, editing, or debugging a quantum algorithm in Python (@qfunc, QBit, QNum, QArray)
Modeling
Writing or debugging native Qmod (.qmod files)
Native Qmod
Compiling a model: synthesize(), constraints, hardware targets
Synthesis
Running a circuit: sample, observe, calculate_state_vector, variational loops
Execution
Interpreting results: histograms, energy curves, most-probable states
Post-processing
Inspecting a synthesized program: gate counts, depth, hardware fit
Analyzer
Translating Qiskit code into Classiq models
Qiskit migration
For requests that span multiple phases (for example, “model this and run it”), the agent organizes the full pipeline end-to-end.
The agent invokes the classiq-setup skill, which walks through the full installation in your environment: it runs an environment diagnostic, installs the classiq package via pip, opens a browser window for authentication, and confirms everything is ready with a final status summary.
The bundled classiq-mcp server connects automatically when the plugin is enabled.
Run /plugin list and confirm the plugin appears.
Run /mcp to open the MCP panel and check the classiq-mcp status. If it shows as failed or cached, select Reconnect; if it is disabled for the project, toggle it back on.
If it still does not appear, run /reload-plugins. Plugins loaded via --plugin-dir are session-scoped, so if you restart Claude Code you must pass the flag again.
In the desktop application, open Customize in the sidebar, confirm the classiq-mcp server is enabled (use the toggle if it is off), then reload the window (Command Palette → Developer: Reload Window).In the CLI, the server appears under /mcp; you can also run agent mcp list to check its status or agent mcp enable to enable it, and pass --approve-mcps to auto-approve servers on launch.If the server still does not appear, re-copy the extracted plugin directory into ~/.cursor/plugins/local/ (desktop) or re-run with --plugin-dir (CLI), then reload.
Run codex plugin list to confirm the plugin is installed.
Start a new Codex task or session. Already-running sessions do not pick up newly installed plugins.
In the new session, run /mcp to confirm the classiq-mcp server is connected.
Open Agent Customizations and go to MCP Servers, then confirm the classiq-mcp server is listed and enabled.If it is missing, check that the plugin itself is enabled under Plugins, and that MCP access is not turned off in your settings (chat.mcp.access).
Skills do not load
Claude Code
Cursor
Codex
Copilot
Run /skills to confirm the plugin’s skills appear. If they are absent:
Run /reload-plugins to reload the plugin.
Check the /pluginErrors tab for load errors.
Plugins loaded via --plugin-dir are session-scoped, so if you relaunched Claude Code, pass the flag again.
In the desktop application, skills appear in Customize → Skills, and in the CLI they appear in the / menu. If they are absent:
Reload the window (Command Palette → Developer: Reload Window) in the desktop application, or start a new CLI session.
Confirm the plugin appears in Customize (desktop), or that enabled_plugins/--plugin-dir points at the plugin folder (CLI).
Make sure no marketplace plugin of the same name is installed, since it takes precedence over the local copy.
Run /skills to confirm the plugin’s skills appear. If they are absent:
Start a new Codex task or session. Already-running sessions do not pick up newly installed plugins.
Run codex plugin list to confirm the plugin itself is installed.
Open Agent Customizations and go to Skills, then confirm the Classiq skills are listed. The plugin’s row under Plugins also shows how many skills it provides.If they are absent, confirm the plugin is enabled under Plugins, and that skills are not turned off in your settings (chat.useAgentSkills).
Local plugins do not load on enterprise plans
Enterprise and team plans may restrict local plugin loading by default. If the steps above haven’t resolved the issue, check with your organization admin whether any of the following restrictions are in effect.
Claude Code
Cursor
Codex
Copilot
The disableSideloadFlags managed setting, when enabled by an admin, rejects the sideload flags including --plugin-dir.
Local plugin imports are off by default on Enterprise. An admin must enable Allow Local Plugin Imports in the Cursor dashboard under Settings → Security & Identity → Marketplace and Plugins.
An admin-managed requirements.toml policy file can restrict local plugin sources (for example, restrict_to_allowed_sources = true).
An enterprise-managed managed-settings.json file can restrict which plugins are allowed, through enabledPlugins (plugins installed or blocked for all users).