> ## Documentation Index
> Fetch the complete documentation index at: https://docs.classiq.io/llms.txt
> Use this file to discover all available pages before exploring further.
# Quantum Engineer Plugin
## Overview
This is an enterprise-grade feature available exclusively to Classiq's enterprise customers.
The **Quantum Engineer** plugin brings Classiq expertise directly into your AI-powered IDE. It teaches coding agents like Claude Code, Cursor, and Codex how to model, synthesize, execute, analyze, and post-process quantum programs with Classiq.
Build, run, and analyze quantum programs in natural language — describe what you want and the agent handles every step, from writing the model to reading back results.
Programs are expressed in **Qmod**, and draw on the open library of reusable quantum functions. Synthesis delegates to Classiq's backend engine, which compiles high-level models into hardware-optimized circuits automatically.
The plugin includes skills for each phase of quantum development:
* **Modeling** — write quantum algorithms in Python using Classiq.
* **Synthesis** — compile a model into a quantum program with `synthesize()`, constraints, and hardware targets.
* **Execution** — run circuits: `sample`, `observe`, `calculate_state_vector`, and variational loops.
* **Post-processing** — interpret results: histograms, energy curves, and most-probable states.
* **Analyzer** — inspect synthesized programs for gate counts, depth, and hardware fit.
* **Qiskit migration** — translate existing Qiskit code into Classiq models.
A built-in reference layer keeps the agent's knowledge current as it works.
## Installation
The marketplace is access-controlled: reach out to Classiq to get onboarded, and you'll receive a personal GitHub invitation to the repository. Accept it first — the steps below assume you already have access.
Add the marketplace once per machine, using the repository from your invitation:
```
/plugin marketplace add /
```
Then install the plugin:
```
/plugin install classiq-quantum-engineer@classiq
```
Restart Claude Code after the first install so the bundled MCP server comes up. You'll be prompted to approve the `classiq-mcp` server on first use.
**Keeping it up to date:**
```
/plugin marketplace update classiq # pull the latest catalog
/plugin update classiq-quantum-engineer@classiq # update the plugin
/plugin list # see what you have installed
```
* Open Cursor Settings (Cmd+Shift+J) → Plugins.
* Choose Add/import plugin.
* Paste the GitHub URL from your Classiq invitation.
* Select classiq-quantum-engineer and install it.
* Confirm the plugin status shows Imported.
* Reload the window — open the Command Palette and run Developer: Reload Window.
* Enable the MCP server — go to Settings → Features → Model Context Protocol and turn on Classiq Docs.
* Confirm skills loaded — go to Settings → Rules → Agent Decides. You should see skills such as classiq, classiq-modeling, classiq-synthesis, and classiq-execution.
**Keeping it up to date:**
To pick up the latest plugin version, remove and re-import the plugin from the GitHub URL in your invitation, then reload the window.
After updating, verify that:
* Settings → Plugins shows classiq-quantum-engineer with status Imported.
* Settings → Features → Model Context Protocol shows Classiq Docs enabled.
* Settings → Rules → Agent Decides includes the Classiq skills.
The plugin requires the `classiq` Python package in your project's environment. If you don't have it yet, ask the agent to install it — see the **Install Classiq** example in the [Examples](#examples) section below, or [Use Python and Classiq](/getting-started/sdk_installation) for manual SDK setup.
## Usage
Once installed, just describe what you want in natural language — no special syntax required. The agent picks the right skill for each phase of the work:
| You ask for | Skill that responds |
| ------------------------------------------------------------------------------------------------- | ------------------- |
| Writing, editing, or debugging a quantum algorithm in Python (`@qfunc`, `QBit`, `QNum`, `QArray`) | Modeling |
| Writing or debugging native Qmod (`.qmod` files) | Native Qmod |
| Compiling a model — `synthesize()`, constraints, hardware targets | Synthesis |
| Running a circuit — `sample`, `observe`, `calculate_state_vector`, variational loops | Execution |
| Interpreting results — histograms, energy curves, most-probable states | Post-processing |
| Inspecting a synthesized program — gate counts, depth, hardware fit | Analyzer |
| Translating Qiskit code into Classiq models | Qiskit migration |
For requests that span multiple phases — "model this and run it" — the agent organizes the full pipeline end-to-end.
## Examples
**Prompt:**
```
Create a Bell state, synthesize it, run it on the simulator, and show the measurement counts.
```
**Generated code:**
```python theme={null}
from classiq import *
@qfunc
def main(res: Output[QArray[QBit, 2]]):
allocate(2, res)
H(res[0])
CX(res[0], res[1])
qprog = synthesize(main)
result = sample(qprog)
print(result)
```
**Output:**
```
res counts probability bitstring
0 [1, 1] 1036 0.505859 11
1 [0, 0] 1012 0.494141 00
```
**Prompt:**
```
Write a quantum program that puts a 1-qubit integer in superposition, assigns 2 to a second integer, computes their sum, and runs it.
```
**Generated code:**
```python theme={null}
from classiq import *
@qfunc
def main(x: Output[QNum], y: Output[QNum], z: Output[QNum]):
allocate(1, x)
H(x)
y |= 2
z |= x + y
qprog = synthesize(main)
res = sample(qprog)
print(res)
```
**Output:**
| x | y | z | counts | probability |
| - | - | - | ------ | ----------- |
| 0 | 2 | 2 | 1049 | 0.512 |
| 1 | 2 | 3 | 999 | 0.488 |
**Prompt:**
```
Use Grover's algorithm to find all pairs (x, y) of 2-bit integers where x + y < 4 and (x * y) % 4 == 2. Run it and show which states get amplified.
```
**Generated code:**
```python theme={null}
from classiq import *
VAR_SIZE = 2
class GroverVars(QStruct):
x: QNum[VAR_SIZE]
y: QNum[VAR_SIZE]
@qperm
def my_predicate(vars: Const[GroverVars], res: QBit) -> None:
res ^= (vars.x + vars.y < 4) & ((vars.x * vars.y) % 4 == 2)
@qfunc
def main(vars: Output[GroverVars]):
allocate(vars)
hadamard_transform(vars)
power(
2,
lambda: grover_operator(
lambda vars: phase_oracle(predicate=my_predicate, target=vars),
hadamard_transform,
vars,
),
)
qprog = synthesize(main)
result = sample(qprog)
result
```
**Output:**
| vars.x | vars.y | probability |
| ------ | ------ | ----------- |
| 1 | 2 | 0.481 |
| 2 | 1 | 0.463 |
| 2 | 2 | 0.006 |
**Prompt:**
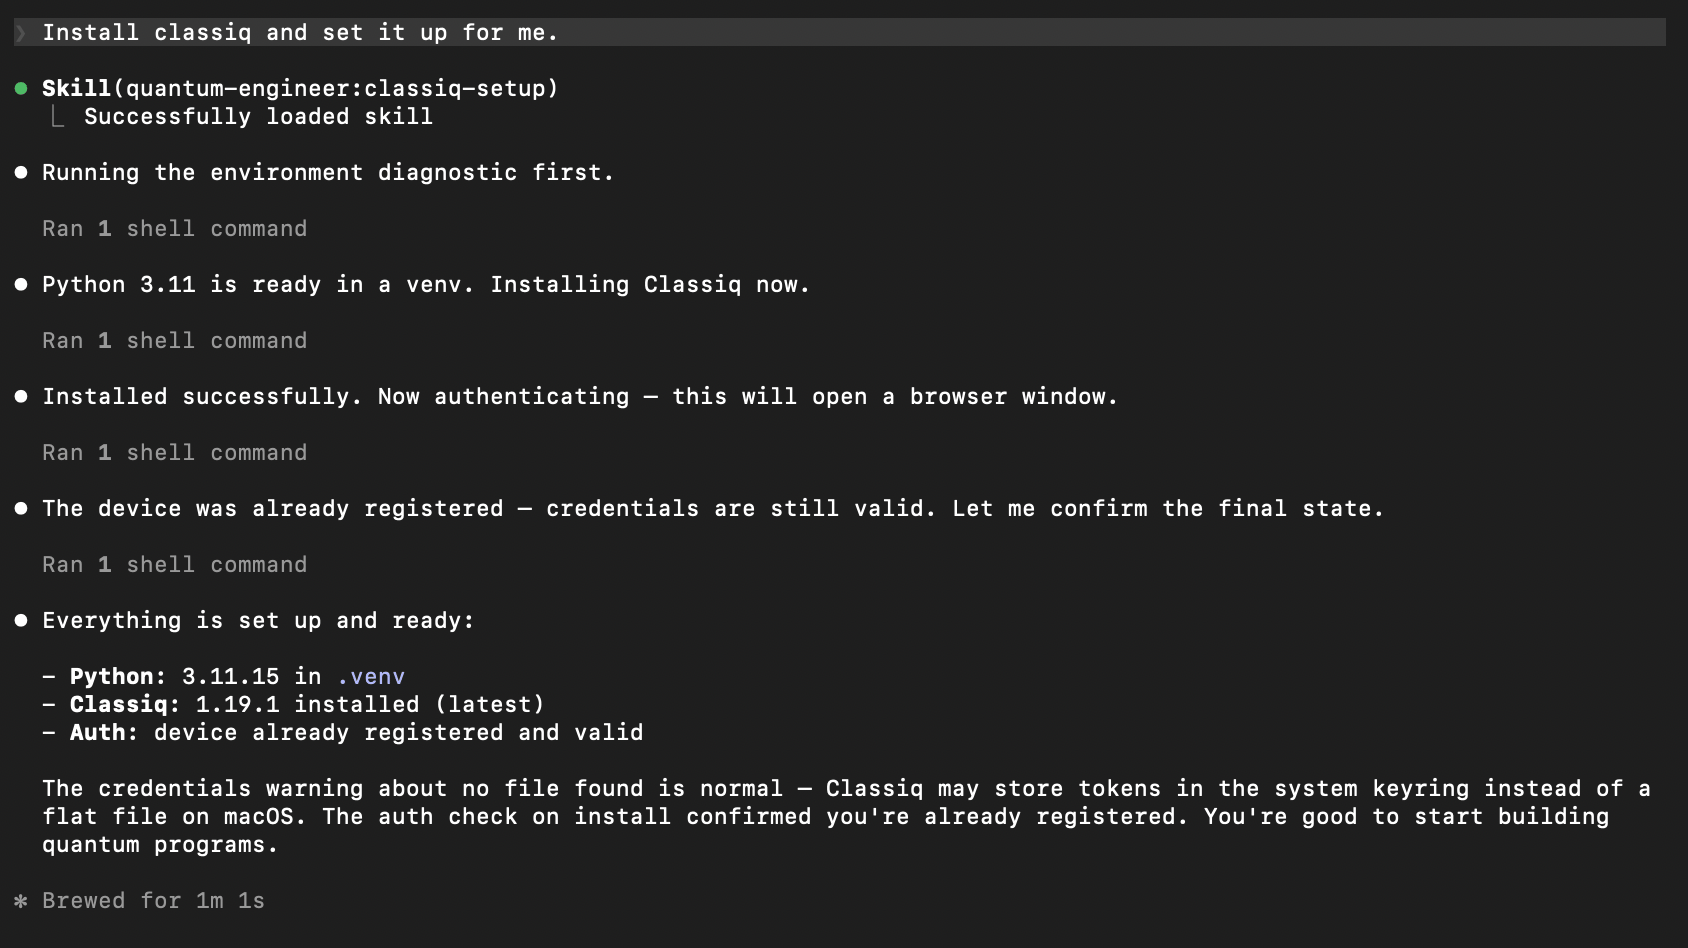
```
Install classiq and set it up for me.
```
The agent invokes the **Setup** skill, which walks through the full installation in your environment: it runs an environment diagnostic, installs the `classiq` package via pip, opens a browser window for authentication, and confirms everything is ready with a final status summary.
 ## Per-project best practices
A small amount of one-time setup per project pays off quickly: a project memory file gives the agent persistent context about your environment, sanity checks let you verify everything is wired up before you start, and a troubleshooting reference saves time when something unexpected happens.
### Memory file
Both IDEs support a project-level file that the agent reads at the start of every conversation. Use it to record your Python environment and any project-specific conventions — so the agent never has to ask and never guesses wrong.
Create `CLAUDE.md` at the root of your project and fill in the bracketed fields:
```markdown theme={null}
# [Project Name]
## Environment
- Python: [path/to/venv/bin/python]
- Classiq SDK: installed in the environment above
## Backend
Default: Classiq cloud simulator.
[Optional: list hardware targets or execution preferences for this project.]
## Project overview
[One or two sentences describing the quantum algorithms or application this project implements.]
## Conventions
[Any project-specific patterns — naming, file layout, preferred synthesis constraints, etc.]
```
Claude Code picks up `CLAUDE.md` automatically — no additional configuration required.
Create `.cursor/rules/classiq.mdc` at the root of your project. This file gives Cursor persistent Classiq-specific context for the project.
```markdown theme={null}
---
description: Classiq project context
alwaysApply: true
---
# [Project Name]
## Environment
- Python: [path/to/venv/bin/python]
- Classiq SDK: installed in the environment above
## Backend
Default: Classiq cloud simulator.
[Optional: list hardware targets or execution preferences for this project.]
## Project overview
[One or two sentences describing the quantum algorithms or application this project implements.]
## Conventions
[Any project-specific patterns — naming, file layout, preferred synthesis constraints, etc.]
```
The `alwaysApply: true` frontmatter tells Cursor to load this rule for every conversation in the project.
To verify the rule is active, open Settings → Rules and confirm the project rule appears. You can also ask the agent: "What Classiq project context do you see?" The response should reflect the environment and conventions from .cursor/rules/classiq.mdc.
### Sanity checks
Run these checks after installation to confirm the plugin is wired up correctly.
**Verify the plugin is installed:**
```
/plugin list
```
Look for `classiq-quantum-engineer@classiq` in the output. If it is missing, reinstall:
```
/plugin install classiq-quantum-engineer@classiq
```
**Confirm skills are active:**
Run `/status` or ask the agent directly: `"Which Classiq skills do you have loaded?"` The response should name skills such as `classiq-modeling`, `classiq-synthesis`, and `classiq-execution`.
**Confirm the MCP server is running:**
Ask the agent:
```
"Can you look up the Classiq docs for synthesize?"
```
A successful lookup means the `classiq-mcp` server is up. A timeout or "no tools available" reply means the server did not start — see [Troubleshooting](#troubleshooting) below.
**Verify the plugin is installed:**
* Open Cursor Settings → Plugins.
The classiq-quantum-engineer plugin should appear with status Imported. If it is missing, re-import it from the GitHub URL in your invitation.
If import fails, confirm that you accepted the GitHub invitation and are signed into Cursor with an account that can access the repository.
**Confirm skills are active:**
* Go to Settings → Rules → Agent Decides.
You should see skills such as classiq, classiq-modeling, classiq-synthesis, and classiq-execution.
You can also ask the agent:
```
Which Classiq skills do you have loaded?
```
A successful response should name the Classiq skills available to the agent.
**Confirm the MCP server is running:**
* Go to Settings → Features → Model Context Protocol and confirm Classiq Docs is enabled.
Then ask the agent:
```
Can you look up the Classiq docs for synthesize?
```
A successful lookup confirms the MCP server is running. A timeout, missing-tool message, or generic answer without a docs lookup usually means the MCP server did not start correctly.
**Confirm the SDK is available in the project environment:**
Ask the agent:
```
Check whether the classiq Python package is installed in this project environment.
```
If the package is missing, you can ask the agent to install it.
### Troubleshooting
#### MCP server does not start
The `classiq-mcp` server starts automatically on launch, but requires a one-time approval prompt on first use.
1. Run `/plugin list` — confirm `classiq-quantum-engineer@classiq` appears.
2. Go to **Settings → MCP Servers**. If `classiq-mcp` shows as disabled, enable it.
3. Restart Claude Code. The server starts fresh on each launch.
If the server still does not appear after a restart, try reinstalling:
```
/plugin update classiq-quantum-engineer@classiq
```
1. Go to **Settings → Features → Model Context Protocol**.
2. Confirm **Classiq Docs** is toggled on.
3. Reload the window — Command Palette → *Developer: Reload Window*.
If the server still does not appear, remove and re-import the plugin from the GitHub URL in your invitation, then reload.
#### Skills do not load
Skills appear in **Settings → Rules**. If they are absent after installation:
* Quit and relaunch Claude Code.
* Confirm the plugin installed cleanly: `/plugin list` should show `classiq-quantum-engineer@classiq` without an error flag.
Skills appear in **Settings → Rules → Agent Decides**. If they are absent after installation:
* Reload the window — Command Palette → *Developer: Reload Window*.
* Confirm the plugin status in **Settings → Plugins** shows **Imported** without an error.
#### Plugin is installed but not updating
If `synthesize` behavior or skill instructions seem outdated:
```
/plugin marketplace update classiq # pull the latest catalog
/plugin update classiq-quantum-engineer@classiq
```
Restart Claude Code after updating.
If skill instructions seem outdated, remove and re-import the plugin from the GitHub URL in your invitation to pick up the latest version, then reload the window.
## See also
[Use AI with Classiq](/user-guide/ai/index)
## Per-project best practices
A small amount of one-time setup per project pays off quickly: a project memory file gives the agent persistent context about your environment, sanity checks let you verify everything is wired up before you start, and a troubleshooting reference saves time when something unexpected happens.
### Memory file
Both IDEs support a project-level file that the agent reads at the start of every conversation. Use it to record your Python environment and any project-specific conventions — so the agent never has to ask and never guesses wrong.
Create `CLAUDE.md` at the root of your project and fill in the bracketed fields:
```markdown theme={null}
# [Project Name]
## Environment
- Python: [path/to/venv/bin/python]
- Classiq SDK: installed in the environment above
## Backend
Default: Classiq cloud simulator.
[Optional: list hardware targets or execution preferences for this project.]
## Project overview
[One or two sentences describing the quantum algorithms or application this project implements.]
## Conventions
[Any project-specific patterns — naming, file layout, preferred synthesis constraints, etc.]
```
Claude Code picks up `CLAUDE.md` automatically — no additional configuration required.
Create `.cursor/rules/classiq.mdc` at the root of your project. This file gives Cursor persistent Classiq-specific context for the project.
```markdown theme={null}
---
description: Classiq project context
alwaysApply: true
---
# [Project Name]
## Environment
- Python: [path/to/venv/bin/python]
- Classiq SDK: installed in the environment above
## Backend
Default: Classiq cloud simulator.
[Optional: list hardware targets or execution preferences for this project.]
## Project overview
[One or two sentences describing the quantum algorithms or application this project implements.]
## Conventions
[Any project-specific patterns — naming, file layout, preferred synthesis constraints, etc.]
```
The `alwaysApply: true` frontmatter tells Cursor to load this rule for every conversation in the project.
To verify the rule is active, open Settings → Rules and confirm the project rule appears. You can also ask the agent: "What Classiq project context do you see?" The response should reflect the environment and conventions from .cursor/rules/classiq.mdc.
### Sanity checks
Run these checks after installation to confirm the plugin is wired up correctly.
**Verify the plugin is installed:**
```
/plugin list
```
Look for `classiq-quantum-engineer@classiq` in the output. If it is missing, reinstall:
```
/plugin install classiq-quantum-engineer@classiq
```
**Confirm skills are active:**
Run `/status` or ask the agent directly: `"Which Classiq skills do you have loaded?"` The response should name skills such as `classiq-modeling`, `classiq-synthesis`, and `classiq-execution`.
**Confirm the MCP server is running:**
Ask the agent:
```
"Can you look up the Classiq docs for synthesize?"
```
A successful lookup means the `classiq-mcp` server is up. A timeout or "no tools available" reply means the server did not start — see [Troubleshooting](#troubleshooting) below.
**Verify the plugin is installed:**
* Open Cursor Settings → Plugins.
The classiq-quantum-engineer plugin should appear with status Imported. If it is missing, re-import it from the GitHub URL in your invitation.
If import fails, confirm that you accepted the GitHub invitation and are signed into Cursor with an account that can access the repository.
**Confirm skills are active:**
* Go to Settings → Rules → Agent Decides.
You should see skills such as classiq, classiq-modeling, classiq-synthesis, and classiq-execution.
You can also ask the agent:
```
Which Classiq skills do you have loaded?
```
A successful response should name the Classiq skills available to the agent.
**Confirm the MCP server is running:**
* Go to Settings → Features → Model Context Protocol and confirm Classiq Docs is enabled.
Then ask the agent:
```
Can you look up the Classiq docs for synthesize?
```
A successful lookup confirms the MCP server is running. A timeout, missing-tool message, or generic answer without a docs lookup usually means the MCP server did not start correctly.
**Confirm the SDK is available in the project environment:**
Ask the agent:
```
Check whether the classiq Python package is installed in this project environment.
```
If the package is missing, you can ask the agent to install it.
### Troubleshooting
#### MCP server does not start
The `classiq-mcp` server starts automatically on launch, but requires a one-time approval prompt on first use.
1. Run `/plugin list` — confirm `classiq-quantum-engineer@classiq` appears.
2. Go to **Settings → MCP Servers**. If `classiq-mcp` shows as disabled, enable it.
3. Restart Claude Code. The server starts fresh on each launch.
If the server still does not appear after a restart, try reinstalling:
```
/plugin update classiq-quantum-engineer@classiq
```
1. Go to **Settings → Features → Model Context Protocol**.
2. Confirm **Classiq Docs** is toggled on.
3. Reload the window — Command Palette → *Developer: Reload Window*.
If the server still does not appear, remove and re-import the plugin from the GitHub URL in your invitation, then reload.
#### Skills do not load
Skills appear in **Settings → Rules**. If they are absent after installation:
* Quit and relaunch Claude Code.
* Confirm the plugin installed cleanly: `/plugin list` should show `classiq-quantum-engineer@classiq` without an error flag.
Skills appear in **Settings → Rules → Agent Decides**. If they are absent after installation:
* Reload the window — Command Palette → *Developer: Reload Window*.
* Confirm the plugin status in **Settings → Plugins** shows **Imported** without an error.
#### Plugin is installed but not updating
If `synthesize` behavior or skill instructions seem outdated:
```
/plugin marketplace update classiq # pull the latest catalog
/plugin update classiq-quantum-engineer@classiq
```
Restart Claude Code after updating.
If skill instructions seem outdated, remove and re-import the plugin from the GitHub URL in your invitation to pick up the latest version, then reload the window.
## See also
[Use AI with Classiq](/user-guide/ai/index)