> ## Documentation Index
> Fetch the complete documentation index at: https://docs.classiq.io/llms.txt
> Use this file to discover all available pages before exploring further.
# Using Python and Classiq
## AI-assisted setup
The fastest way to set up Classiq is to copy the setup prompt into your AI coding assistant.
Use this prompt if you want your assistant to install the SDK, check your Python environment,
authenticate your account, and verify that Classiq is ready to use.
Follow these instructions to install and authenticate the Classiq Python SDK on the user's machine.
Important constraints:
* Do not ask for, collect, view, store, or transmit the user's Classiq credentials, browser session, authentication token, or local credential files.
* The customer must personally complete any browser-based login or confirmation step.
* Use the Python environment the customer intends to use for Classiq work, such as their active virtual environment, conda environment, notebook kernel, or IDE interpreter.
* If an action requires admin/root permissions, stop and ask the customer before proceeding.
Steps:
1. Verify Python is available and that the active environment is correct.
Run:
```bash theme={null}
python --version
python -m pip --version
```
Classiq's Python SDK documentation currently states support for Python 3.8 through 3.12. If the user's Python version is different, offer creating a virtual environment with the correct version.
2. Install or upgrade the Classiq package in the active Python environment.
Prefer:
```bash theme={null}
python -m pip install -U classiq
```
Do not use a different Python or pip executable unless the customer explicitly confirms that it is the intended environment.
3\. Verify installation.
Run:
```bash theme={null}
python -m pip show classiq
```
4. Authenticate the SDK.
Run the following in Python, a notebook cell, or the user's intended Python environment: `import classiq; classiq.authenticate()`
5. A browser window or authentication URL should appear.
Instruct the user to personally open the link, sign in if needed, and click the confirmation button. Do not complete this browser step on behalf of the user.
6. After confirmation, verify that authentication completed successfully by rerunning or testing a minimal Classiq import/session check.
7. If any issue occurs, consult the Classiq Registration and Installation documentation:
[https://docs.classiq.io/getting-started/registration\_installations](https://docs.classiq.io/getting-started/registration_installations)
Use the troubleshooting section for common authentication issues, including cases where the device is not authenticated or the system is headless/no-browser.
## Manual Python SDK Installation
**After registering to the platform**, install the SDK package using `pip`:
The SDK is currently supported for Python versions `3.8` to `3.12`.
```bash theme={null}
pip install -U classiq
```
Run `pip install -U classiq` in your command line, or use `!pip install -U classiq` from your Python IDE.\
Make sure you are within the appropriate Python environment.
## Authentication
Authenticate the device with your Classiq account. **In Python**, run these lines:
```Python theme={null}
import classiq
classiq.authenticate()
```
A confirmation window opens in your web browser. Confirm the authentication:
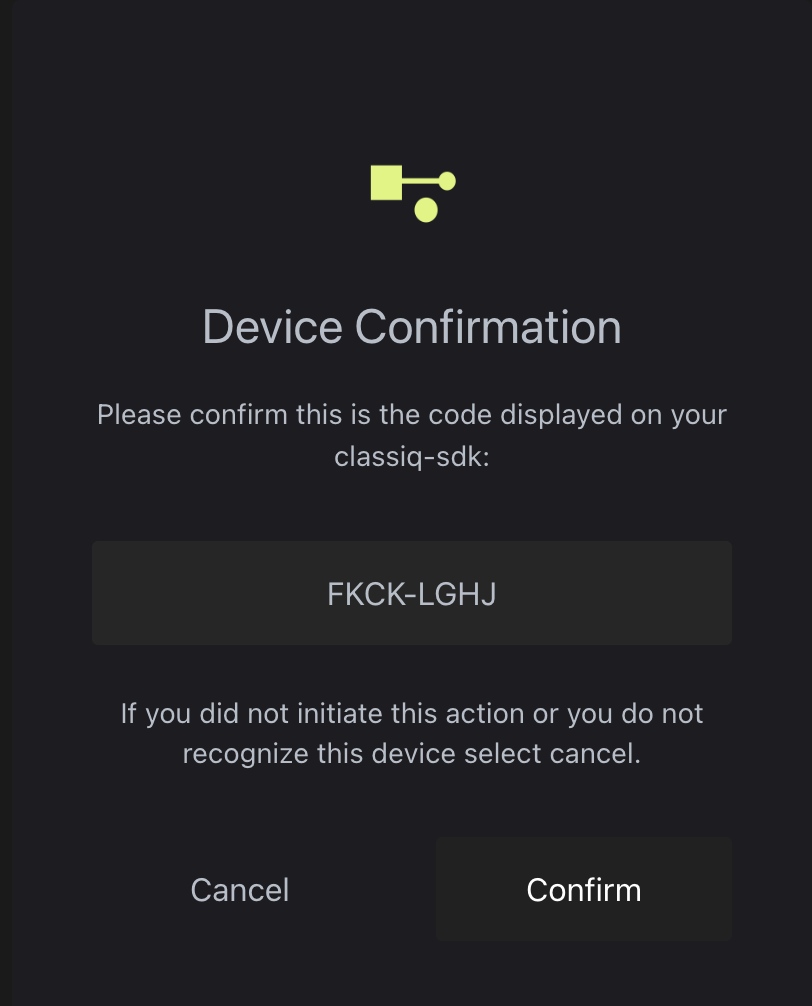 Once you receive the confirmation you are good to go!
If you encounter an issue, look for a solution in the [troubleshooting section](#Python-sdk-installation-troubleshooting) or ask in the [community Slack](https://short.classiq.io/join-slack).
## Platform Version Updates
Every few weeks a new version of the platform launches. The web-based IDE at [platform.classiq.io](https://platform.classiq.io/) automatically updates.
Update the Python SDK package manually with this command:
```bash theme={null}
pip install -U classiq
```
To update the Python SDK for a specific version, run this in the terminal:
```bash theme={null}
pip install classiq=={DESIRED_VERSION}
```
and replace the `DESIRED_VERSION` with the number of your desired version, e.g. `0.40`. You can check what version of Classiq is installed with:
```bash theme={null}
pip show classiq
```
**NOTE**: Only the last three versions of Classiq are supported. For example, if the current version is `0.41`, only versions `0.41`, `0.40`, and `0.39` are supported.
\*Once version `0.52` is released - execution of quantum programs with older SDK versions might result in errors or unexpected behavior. To ensure proper execution, upgrade your SDK to the latest version.
## Python SDK Installation Troubleshooting
Check your user profile page on the platform (when logged in, click your avatar
on the top-right, then "Profile Settings"). Look for the "SDK Configuration"
section. If it's not there, simply ignore this step.
Otherwise, download the file from the profile and copy it to:
* Mac & Linux: `~/.config/classiq/config.env`
* Windows: `%APPDATA%\classiq\config.env`
Try to use the following command in Python:
```Python theme={null}
import classiq
classiq.authenticate(overwrite=True)
```
The authentication procedure on headless Linux systems stores the tokens locally in a credentials file. While you must still run the authentication once, it can be done on another system with a browser.
On some Apple computers, the following might pop up:
Once you receive the confirmation you are good to go!
If you encounter an issue, look for a solution in the [troubleshooting section](#Python-sdk-installation-troubleshooting) or ask in the [community Slack](https://short.classiq.io/join-slack).
## Platform Version Updates
Every few weeks a new version of the platform launches. The web-based IDE at [platform.classiq.io](https://platform.classiq.io/) automatically updates.
Update the Python SDK package manually with this command:
```bash theme={null}
pip install -U classiq
```
To update the Python SDK for a specific version, run this in the terminal:
```bash theme={null}
pip install classiq=={DESIRED_VERSION}
```
and replace the `DESIRED_VERSION` with the number of your desired version, e.g. `0.40`. You can check what version of Classiq is installed with:
```bash theme={null}
pip show classiq
```
**NOTE**: Only the last three versions of Classiq are supported. For example, if the current version is `0.41`, only versions `0.41`, `0.40`, and `0.39` are supported.
\*Once version `0.52` is released - execution of quantum programs with older SDK versions might result in errors or unexpected behavior. To ensure proper execution, upgrade your SDK to the latest version.
## Python SDK Installation Troubleshooting
Check your user profile page on the platform (when logged in, click your avatar
on the top-right, then "Profile Settings"). Look for the "SDK Configuration"
section. If it's not there, simply ignore this step.
Otherwise, download the file from the profile and copy it to:
* Mac & Linux: `~/.config/classiq/config.env`
* Windows: `%APPDATA%\classiq\config.env`
Try to use the following command in Python:
```Python theme={null}
import classiq
classiq.authenticate(overwrite=True)
```
The authentication procedure on headless Linux systems stores the tokens locally in a credentials file. While you must still run the authentication once, it can be done on another system with a browser.
On some Apple computers, the following might pop up:
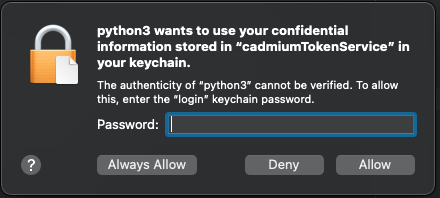 Make sure to type your device password and click `Always Allow` **twice**.